Monday 9 July 2012

Stranding Edinburgh

I have a new project underway - Luckenbooth Brooch by Ron Schweitzer.
 This is a 'commission' of a sort - I am knitting it for the sister of a friend. She bought it as a kit a few years ago and recently came to the realisation that she would never find the time to start it, never mind complete it. A search was on to find someone who would handknit it for her, here in Shetland. You would think that would be easy, plenty of wonderful handknitters around, with the right skills. It seems, though, that nobody wanted the job - Margaret couldn't understand why. Eventually someone told her - because it wasn't a 'Shetland' pattern, although the wool was Shetland and it had been designed for the Wool Brokers here in Lerwick, traditional knitters would have had to follow a chart.
 These knitters know most of the traditional patterns off by heart - they never need to look at a chart. It is just irritating to keep looking at a chart if you are used to flying along at top speed. Knitters like me, who don't have 40 odd years of practice at this, are quite happy following a chart. So I agreed to do it this once (I am not usually keen on knitting to order - it has a faint whiff of drudgery about it).


I am really enjoying it as it turns out. It is time-consuming - each round of 400 plus stitches is taking me about 45 minutes at the moment - but the pattern itself is a lot easier than the bigger motifs in fair isle knitting and can be memorised fairly quickly , so that after the first repeat or two, I don't keep having to check the chart and can get on with watching Lewis or King or whatever.

The Luckenbooth brooch is a traditional Scottish, rather than Shetlandic/Norse, symbol. They are named after the Lucken Booths, or 'locked booths' - early shops around St. Giles Cathedral in Edinburgh, that sold jewellery and trinkets. The broochy were often given as a betrothal gift, and later pinned to the shawls of babies to protect them from evil spirits. Normally made of silver, a Luckenbooth brooch consists of two intertwined hearts, often topped with a crown. Lots of modern examples on Etsy

Monday 9 April 2012

She is Complete!

Finished, blocked and all.


Learning by doing
One of the reasons I wanted to do this project was to get myself out of my comfort zone and trying some new techniques. Knitting socks had become a bit addictive and I was bored following patterns. The internet is such a brilliant source of help and instruction with new techniques, especially YouTube - it is so much easier to learn practical techniques from actual demonstrations. These are some of the new techniques I mastered.

Steeks

I carried on knitting in the round until the neckline, adding extra stitches at the armholes, which I later cut through and bound, before picking up the stitches for the sleeves. This method, called steeks or steeking in the US, means you can keep on knitting past the armhole.

Purling with stranded knitting is laborious and slows you down considerably. I am not sure this method is called steeks here in Shetland. I must find out if there is a dialect word.

There are lots of instructions, both written and video, on the net to show you how to do this, if you are thinking of trying it.

Although cutting through your carefully crafted knitting probably sound scary, there is nothing to fear if you are using the right yarn. It works best with yarn that is very, well, woolly. Shetland wool has all these little stray fibres that hook around each other, especially after they have been washed and dried. They give the garments that lovely 'bloom',  make stranded  knitting much easier than using 'smooth' yarns and also make unravelling very unlikely.

Short Row Shaping

I used short row shaping to make the cap sleeves and shape the shoulders. This was a new technique for me, though I suppose making a heel in socks is a form of short row shaping. It turned out to be one of these things where you can't see how it will work, but if you just trust the instructions - Hey! it works!
It took me a while to work out what to do about the sleeves.
Shetland wool is a joy to knit with, but Kelsey is only three and the gnarly, yarniness of it is probably not such an attractive feature if it scratches your wee skin. Her mum and I thought it would be best to make it so that it could be worn over a T-shirt, so short sleeves would be better. I couldn't think how the sleeves might look. Then I spotted Gudrun Johnston's Melby Jumper Dress in Knit Real Shetland. Cap sleeves work so well with this tunic length.


I-Cord Cast Off
The neckline is formed using a three stitch, I-cord cast off, a technique I learned from one of Kate Davies' wonderful designs. This is a good example, though, where I put form over function and what looked good just didn't work in practice. Although it gives lovely edge, it is very firm.It would have been such a struggle to get Kelsey's wee noggin through the neck. I didn't want her associating the sweater with pain and discomfort, so out came the scissors again! I cut a little notch and added an i-cord loop and a button. Because this wasn't a planned cut, there are no extra stitches to cut through and bind, so it has formed a little gap and interrupted the pattern.

Purist would shudder, but I want it to be worn and enjoyed....


Sunday 4 March 2012

Using the Makkin Belt


A Gansey for Kelsey is coming along quite nicely, if not at super speed. I have changed my knitting method  and am trying the traditional Shetland knitting belt, instead of a circular needle. My stitches were getting caught all the time at the point where the flexible part meets the needle. It was really slowing me down, so I have borrowed a very well used knitting belt, or makkin belt in the Shetland dialect, from a kind colleague - the lovely Muriel. 

To use the knitting belt, you put it round your waist and position the padded part slightly to the right. You use four long double-pointeds, three to hold the knitting and one to knit with. You place the end of the needle into one of the holes in the belt, the one you have just knitted on to. The belt then supports a lot of the weight of the garment and leaves you free to use the end of the needles. I am still a snail compared to my Shetland knitting friends, but it has speeded me up a bit.

I am finding the design side of things an interesting process. What started off as a sweater has now become a sweater dress with cap sleeves. I  am not sure quite how I'll do the shaping at the neck and the sleeves.I have no experience of this, but that is one of the reasons for doing this project - to learn through doing. 
This is Kelsey's favourite sweater dress, so I will use it for the measurements and shaping.
Colour and pattern is another matter - I'll post about that next time.


Monday 20 February 2012

A Gansey for Kelsey

I have decided what my project is to be - A Gansey for Kelsey. Kelsey is the daughter of my lovely friend a co-worker, Susan. Kelsey is only just turned three so it will not be a big gansey - ideal for a first.
Kelsey likes pink and purple and so do I, so I went through my collection, and paid a visit to both of the brilliant wool shops in Lerwick and bought some more shades....

I then knitted up some swatches so that I could do the maths - I borrowed a top of Kelsey's to get the measurements. These are not necessarily the patterns I will use, I just needed to check my gauge on pattern and corrugated rib. Then some horrible calculations, including working out not only the number of stitches to cast on, but also working out which numbers divide evenly into that number. This is so that you can choose the right motifs to fit.
I am using the Mary-Jane Mucklestone book 200 Fair Isle Motifs. It is brilliantly well laid out, giving you the number of stitches and rows needed for each motif, two colourway suggestions and a plainer chart in black and white.I look through and pick the ones that would fit and that I like the look of and then start trying to put it together on a square chart. Getting the colours to work is the really hard bit for me.

Sunday 29 January 2012

A New Beginning

A number of years ago at a family gathering my sister and my mum were bringing their knitting to me off and on during the evening, just  to sort a few little glitches, or to ask for advice. My sons were very Star Wars at the time. One of them said, 'Mum, you're like the Jedi Master for knitting in this family, and Auntie Issie is like a Paduan Learner.'

I am ashamed to say, I did think of myself as a pretty fair knitter. A few years later we moved to Shetland for work reasons. When I got here I soon realised that I was just an apprentice - everyone here can knit, and not just to a fair standard. You can't throw a stick without hitting a wonderfully skilled knitter. Lots of people my age made money when still at primary school, selling Fair Isle gloves they had knitted, through local shops.

Although I have done lots of projects since we moved here in 2008, I have avoided knitting Fair Isle, apart from this cowl I knitted the first year I was here. I felt I was not nearly good enough. Though I still do not think I am anything like as skilled as the local craftswomen I have met, I will not get any better by not trying. So, the time has come to make a full-scale, stranded colourwork sweater (gansey) from scratch and to my own design and choice of colours. My friend Karen M, a skilled and experienced knitter since childhood, is going to join me and we'll see if we can't persuade a few others to make a group up. I'll blog about it as we go along.

Today I started getting kit together - let's see what I have already...

Jumper weight yarns in my stash - Jamieson's mainly, some Smith and Jamieson


Books for ideas, tips and tricks - Christmas presents I helped my husband choose for my Christmas gift.


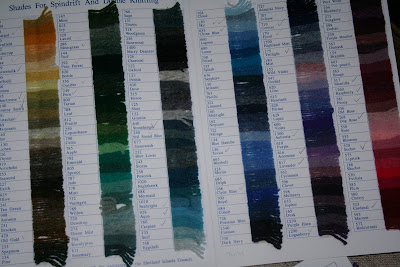
Colour charts for planning. This one is Jamieson's. Their names for the different shades are spot on.


Other kit - grid paper for designs, circular Addi Turbos, colouring pencils.

Time to get started then.....